WooCommerce is a popular e-commerce platform that allows businesses to easily set up an online store and sell their products or services. One important aspect of running an e-commerce business is tracking conversions, or the actions that customers take on your website that indicate they are interested in making a purchase. This can include adding items to their cart, initiating the checkout process, or completing a purchase.
Google Tag Manager is a free tool that allows you to quickly and easily add tracking and marketing tags to your website, all from a single place. One of the benefits of using Google Tag Manager is that you can easily set up conversion tracking for your WooCommerce store, while reusing the triggers for other tags as well. For example, the “add to cart” trigger can be used to send the event data to your Google Analytics (GA4) property and also to send similar data to Facebook, Google Ads, Microsoft Ads, or any other source. While there are plenty of plugins that can send your conversion data directly to GA4 or other marketing sources (Monster Insights, WooCommerce Google Analytics, Pixel Your Site, etc), we believe that utilizing GTM to manage all website tags provides the best flexibility and control over other solutions.
In this article, we will walk you through the process of setting up GA4 conversion tracking for your WooCommerce store using Google Tag Manager. Let’s get started!
Table of Contents
Step 1: Setting up a Google Tag Manager account
The first step in setting up conversion tracking for your WooCommerce store using Google Tag Manager is to create a Google Tag Manager account. If you already have a Google account (such as a Gmail account), you can use that to log in to Google Tag Manager. If you don’t have a Google account, you can create one for free at https://accounts.google.com/signup.
Once you have logged in to Google Tag Manager, you will need to create a new account and container for your WooCommerce store. To do this, click the “Create Account” button on the main dashboard.
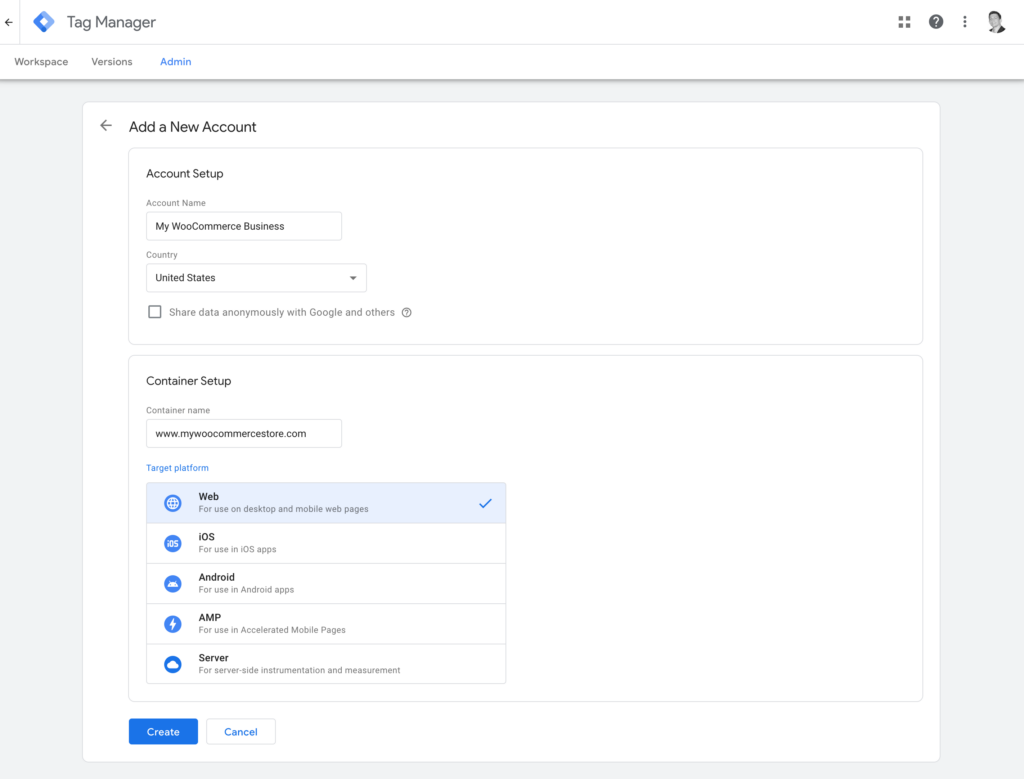
On the next screen, you will be asked to enter your account name and choose a country. You can name your account anything you like (such as “My WooCommerce Store”), and you should choose the country where your business is located.
Next, you will be asked to choose a container for your WooCommerce store. A container is a group of tags, triggers, and variables that you want to manage together. You can create multiple containers within a single account, which can be useful if you have multiple websites or want to track different types of events or actions on your website.
For the purposes of setting up conversion tracking for your WooCommerce store, you will want to create a new container specifically for your store. You will be asked to enter a container name and choose a container type. You can name your container anything you like (such as “WooCommerce Conversion Tracking”), and you should choose “Web” as the container type.
After you have entered your container information, click the “Create” button to create your container. This will bring you to the main dashboard for your new container, which is where you will set up your conversion tracking tags and triggers.
Step 2: Installing the Google Tag Manager code on your WooCommerce store
Now that you have created a Google Tag Manager account and container for your WooCommerce store, the next step is to install the Google Tag Manager code on your website. This code is what allows Google Tag Manager to communicate with your website and track the events that you want to track.
There are two basic ways to install the Google Tag Manager code on your WordPress website. One will require you to access the source code of your website and manually insert the GTM script. The other is to use a WordPress plugin to automatically add the GTM container script to all appropriate pages. One plugin that is highly popular and well maintained (over 700,000 active installs according to WP) is GTM4WP.
In order to install the GTM4WP plugin, visit the WordPress download page it or install it by searching for it inside your WordPress plug-ins page:
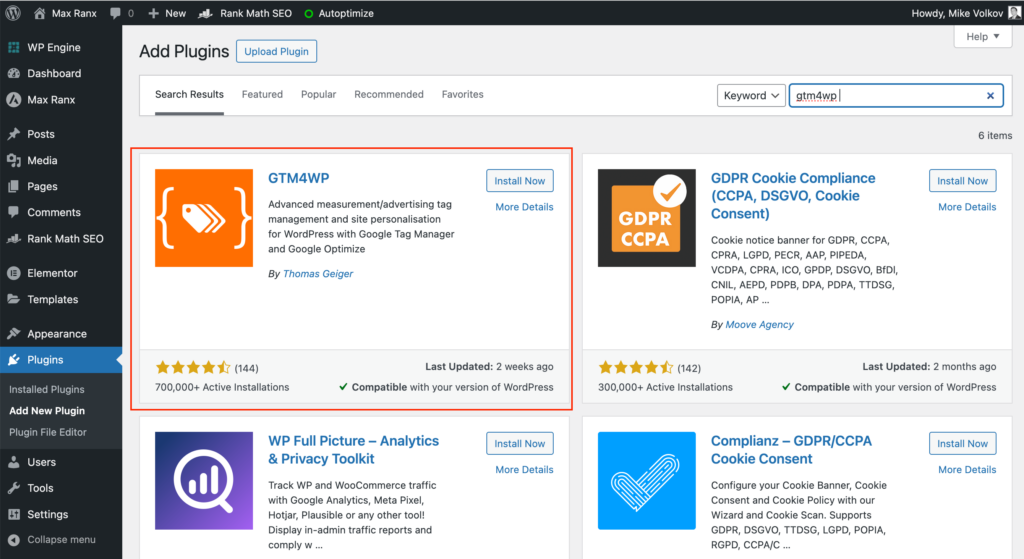
Once the plugin is installed, simply add your GTM container ID on the settings page and the plugin will automatically add the script to all appropriate WordPress pages, including the WooCommerce pages like product, category, cart and checkout.
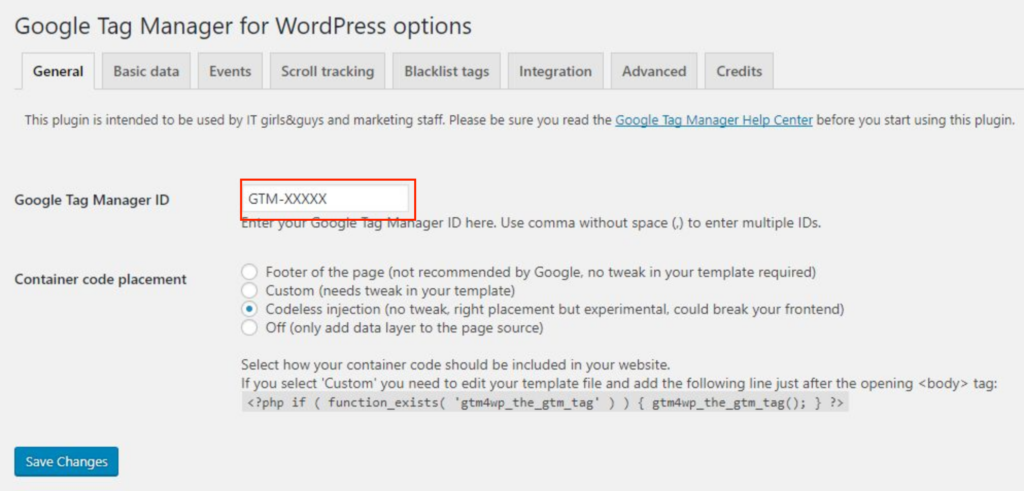
Replace GTM-XXXXX with the actual GTM ID which can be found in your GTM account in the upper right-hand corner:

Now that you have installed the Google Tag Manager code on your WooCommerce store, you can start setting up your conversion tracking tags and triggers.
Step 3: Creating a conversion tracking tag in Google Tag Manager
A tag is a piece of code that you can use to track specific events or actions on your website. In Google Tag Manager, you can create different types of tags for different purposes, such as tracking pageviews, clicks, form submissions, and more.
To set up conversion tracking for your WooCommerce store, you will need to create a new GA4 tag specifically for tracking ecommerce events and conversions. If you haven’t installed your GA4 or Google Tag to track all other events like pageviews then you’ll need to add it as well. To do this, go to your Google Tag Manager dashboard and click the “Tags” link on the left side of the screen. This will bring you to the “Tags” page, where you can create and manage your tags.
To create a new tag, click the “New” button on the top right of the screen. This will bring up the “Tag Configuration” window, where you can choose the type of tag you want to create and configure its settings. The Google Tag is added with the GA4 measurement ID in the Tag ID field and the trigger set to All Pages:
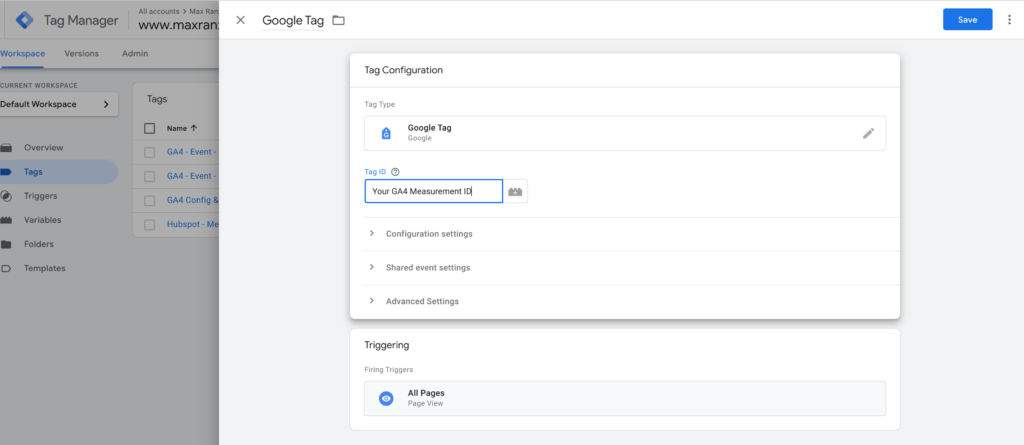
The ecommerce events tag is provided to us by the GTM4WP and can be imported right into your GTM container. The link to the tag can be downloaded here and the plugin website also provides a detailed walkthrough how to import and install the appropriate tag, which can be found on this page:
The best part of this plugin is that it fires all the relevant ecommerce event data in the properly formatted dataLayer.push events. This includes the following events:
- View Item List (category page view)
- View Item (individual product page view)
- Add to Cart
- Remove from Cart
- Begin Checkout
- Add Billing Info
- Add Shipping Info
- Purchase (conversion event automatically recognized in GA4)
Step 4: Testing and debugging your conversion tracking setup
Before you start using your conversion tracking setup to track conversions on your WooCommerce store, it’s a good idea to test and debug your setup to make sure everything is working as expected.
To test your conversion tracking setup, go to your WooCommerce store and perform the actions that should trigger your conversion tracking tag (such as completing a purchase or initiating the checkout process). Then, go back to your Google Tag Manager dashboard and click the “Preview” button on the top right of the screen.
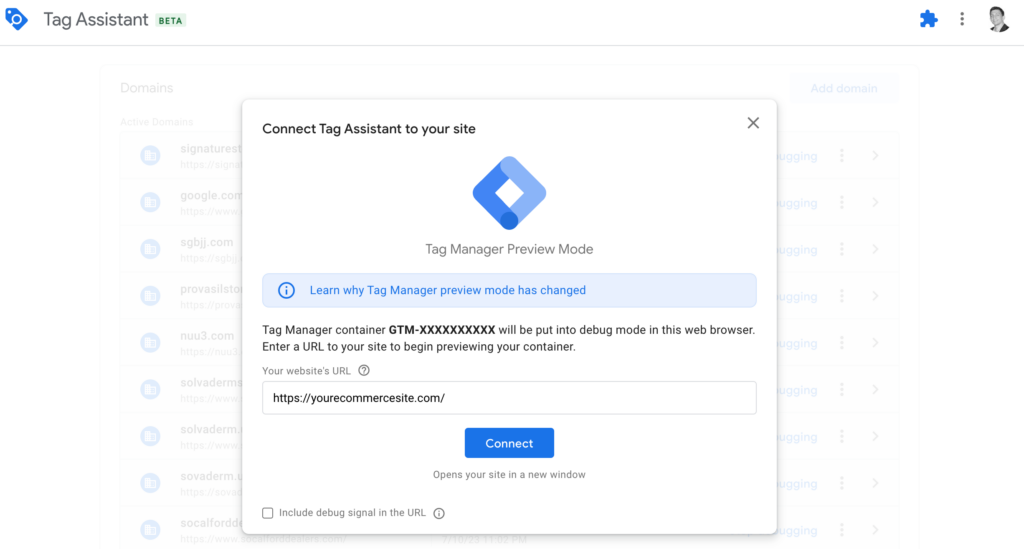
This will open the “Tag Manager Debug Console,” which allows you to see what tags are being fired on your website in real-time. You can use the debug console to check that your conversion tracking tag is firing correctly and that the correct data is being sent to Google Analytics.
If you see any issues with your conversion tracking setup, you can use the debug console to troubleshoot and fix them. For example, if your conversion tracking tag is not firing when it should, you may need to check that your trigger is set up correctly or that the custom event is being properly triggered on your website.
Once you have tested and debugged your conversion tracking setup, you can click the “Publish” button on the top right of the screen to deploy your changes to your live website. This will make your conversion tracking setup active and start tracking conversions on your WooCommerce store. All ecommerce events will automatically get sent to your GA4 property where ecommerce reports will begin populating with product data, ecommerce funnel views, and other ecommerce-related reporting.
Step 5: View Ecommerce Reports in GA4
Google Analytics 4 (GA4) offers an array of ecommerce-related reports crucial for understanding and enhancing the performance of an online business. These reports provide insightful data that can help businesses make informed decisions and optimize their ecommerce strategies.
Ecommerce Overview: This report offers a holistic view of key metrics like revenue, conversion rate, average order value, and the number of transactions. It’s an excellent starting point for understanding overall performance trends.
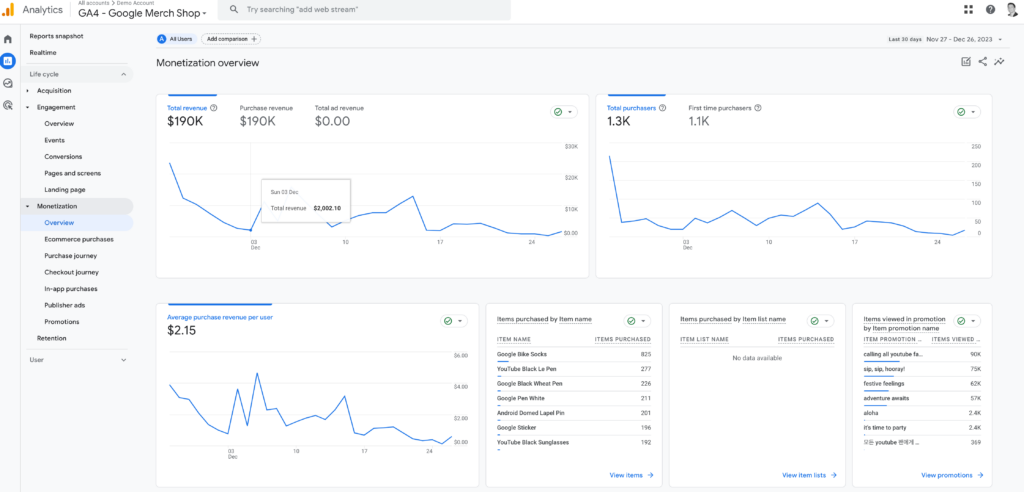
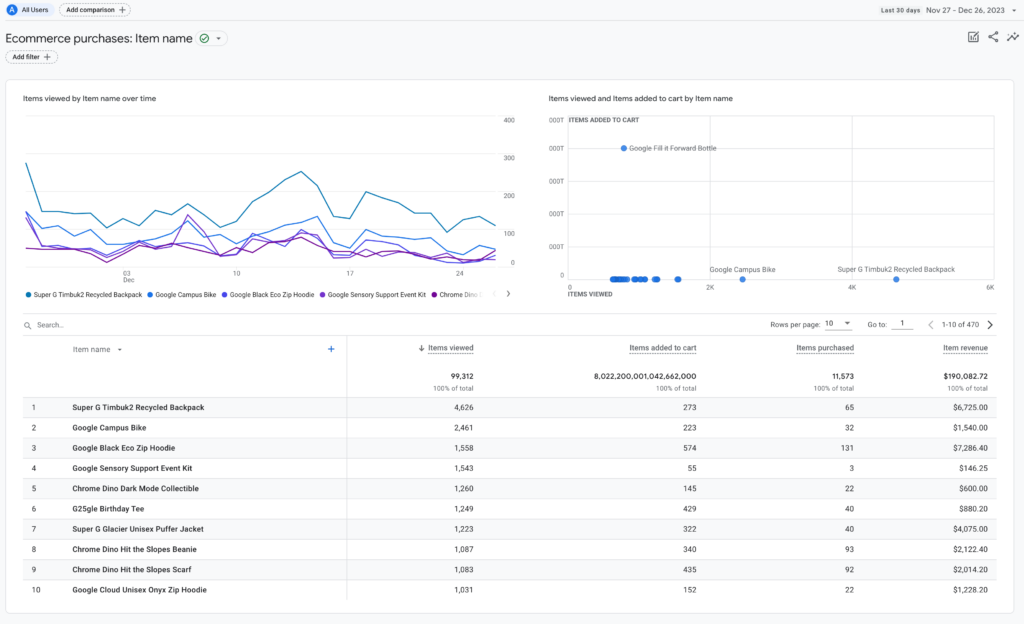
Product Performance: Here, businesses can delve into individual product performance, analyzing metrics such as quantity sold, revenue generated per product, and the number of views or clicks. This insight helps in identifying top-performing products and understanding customer preferences.
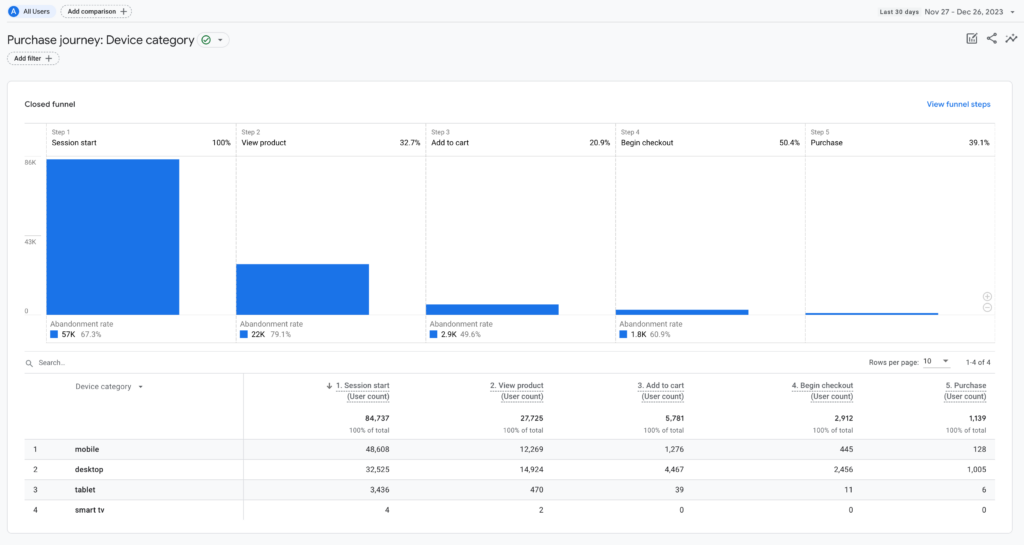
Funnel Analysis: Although not exclusive to ecommerce, funnel analysis in GA4 allows businesses to track user behavior through specific steps of the conversion process, like product views to cart additions to checkouts, providing insights into where users drop off.
By leveraging these GA4 ecommerce reports, businesses can gain a comprehensive understanding of their online store’s performance, identify strengths and weaknesses, and make data-driven decisions to optimize their ecommerce strategy for improved sales and customer satisfaction.
Conclusion
In this article, we have walked you through the process of setting up conversion tracking for your WooCommerce store using Google Tag Manager. By following these steps, you can set up conversion tracking for your WooCommerce store and start tracking the actions that customers take on your website.
This can help you understand which marketing efforts are driving the most sales and make informed decisions about how to allocate your resources. You can also gain valuable insights into what is and isn’t working for your business, and make changes accordingly. This can help you optimize your e-commerce strategy and drive more sales for your WooCommerce store.
I hope this article has been helpful in explaining how to set up conversion tracking for your WooCommerce store using Google Tag Manager. If you have any further questions or need additional assistance, feel free to ask. Good luck with your e-commerce business!

